Introduction to Docker
Taqtile uses Docker containers to allow clients flexibility to install on premises or in their own hosting environments. This document explains how to install and configure Manifest Server using Docker.What is Docker?
Docker is a containerization platform that packages application and all its dependencies together in the form of a docker container to ensure that application works seamlessly in any environment.What is a Container?
A Docker Container is a standardized unit which can be created on the fly to deploy a particular application or environment. Using docker you can install a local server copy of Manifest. It is a very useful tool especially when you don’t have access to the Internet but need to demonstrate Manifest
Prerequisites
Docker set up and installation does require some expertise about docker and how it works. Below are a few articles that can help get you up to speed: In order to set up Manifest using docker you will need the following information that is sent to the Manifest Account Owner through a Welcome email. This email will include important information to get you started with setting up an On-Prem Instance of Manifest using Docker. The important information will include:- A link to our Docker Release Notes section
- The password to Docker
- Number of users as part of the agreed contract
- A unique license key to be populated into the compose file that manages the number of users
- A Sendgrid API Key
Video Tutorial + Supporting documentation
Video Tutorials
Please review the below video links to help you with the specific docker action you are trying to accomplish. Available videos include:- How to deploy Manifest On Premise Installation for Windows
- How to Clear and Reinstall your Manifest On-Premise Installation for Windows (COMING SOON)
- How to Move a Manifest On-Premise Installation of Manifest (COMING SOON)
- How to Update an Existing Manifest On-Premise Installation of Manifest (COMING SOON)
Supporting Documentation
Manifest docker supports x86 based host systems for Windows, Linux or Mac- Windows: https://docs.docker.com/desktop/windows/
- Mac: https://docs.docker.com/desktop/mac/install/
- Linux: https://docs.docker.com/desktop/linux/
How to Set Up Docker
- Download Docker (without registration) or from web (with registration on your computer).
- Install Docker on your computer.
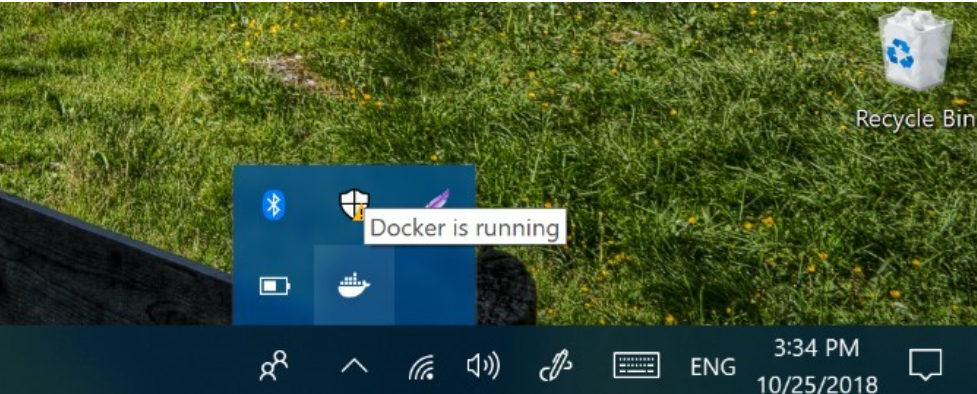
- Click on “Docker for Windows” shortcut and then check that it works in the tray bar:
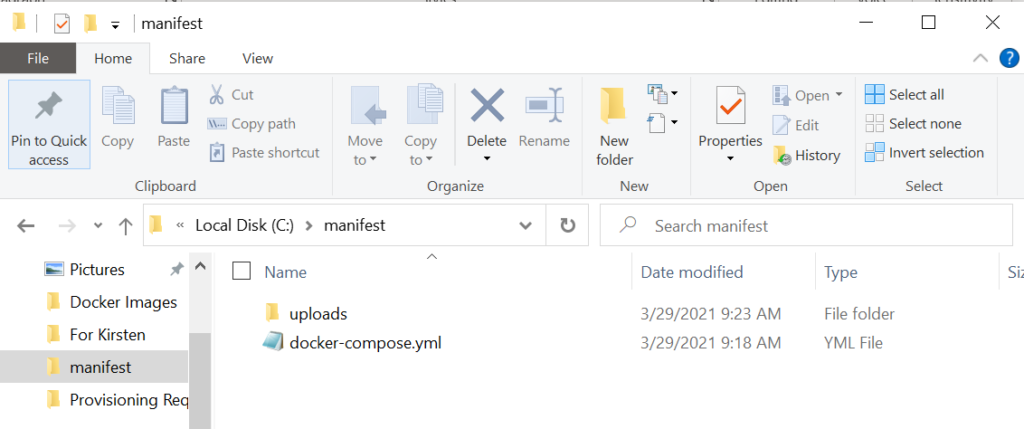
- Create a folder “manifest” in local disk C on your computer. Download the most recent docker-compose file found in the Release Notes section of the Community site. Rename the file to docker-compose.yml. Once the file is renamed place this file into your “manifest” folder. IMPORTANT: Once downloaded be sure to append the file extension to .yml versus .txt
- Create a sub-folder in the newly “manifest” folder that will be referenced in your compose file and will house all the content uploaded into the on-premise Manifest instance.
- Set up environment variables in docker-compose.yml file
How to Populate Variables in Docker-compose.yml File
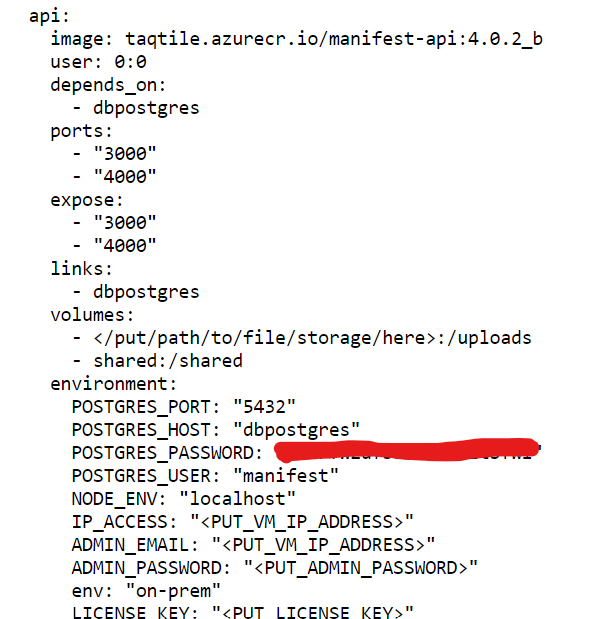
It is VERY IMPORTANT when populating the docker-compose.yml file with the API and WEB variables that information is entered in correctly and accurately. The smallest mistake in the docker-compose file will result in an error. Please make sure that you reference the Docker Release Notes section in order to get the most recent changes and variable updates that come with each Manifest for Docker Release. Below is a table outlining the variables that need to be populated within the docker-compose.yml file. API VARIABLES| Variable | Variable Type | Variable Description | Example |
|---|---|---|---|
| VOLUMES | </put/path/to/file/storage/here>:/uploads | This variable represents the path on your machine where Manifest will persistently store your application files even after restarting your compose. Based on this variable Manifest will store your application files persistently. | /c/manifest/uploads:/uploads |
| IP_ACCESS | <PUT_VM_IP_ADDRESS> | Based on this variable manifest will create stun/turn configuration with our stun/turn container from compose. | 10.0.0.83 (This information can be obtained by typing ipconfig into your machines terminal) |
| ADMIN_EMAIL | <PUT_ADMIN_EMAIL> | With this variable Manifest will generate admin account that will be used to log into the Manifest platforms (web, HL2, iPad, etc) | username@company.com (Use your company email address) |
| ADMIN_PASSWORD | <PUT_ADMIN_PASSWORD> | With this variable Manifest will generate the login password for the Manifest Admin that will be used to log into the Manifest platforms (web, HL2, iPad, etc.) | P@ssword123 (Create an unique password that will be used to log into the Manifest platforms) |
| LICENSE_KEY | ” “ | The license key obtained by your Account Manager that is used to control the number of licenses allowed within the docker install | Example: DdnkLiSNtn8mJMFNkKQlg0oJSUDkyWX1 (This will be obtained from your Account Manager) |
| HOST | <PUT_VM_IP_ADDRESS> | Same as above IP_ACCESS | |
| ROOT ADMIN EMAIL | <PUT_ADMIN_EMAIL> | Same as above ADMIN_EMAIL | |
| ROOT ADMIN PASSWORD | <ROOT_ADMIN_PASSWORD> | Same as above ADMIN_PASSWORD |
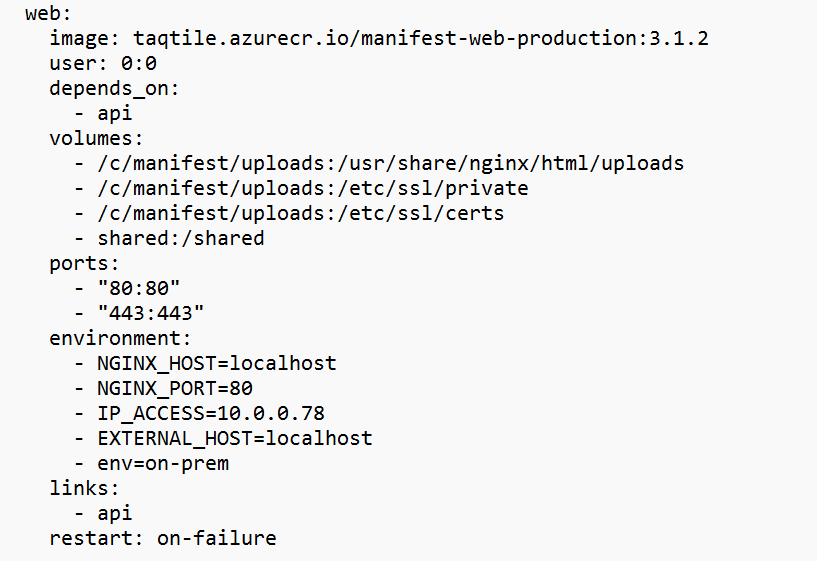
| Variable | Variable Type | Variable Description | Example |
|---|---|---|---|
| VOLUMES | </put/path/to/file/storage/here>:/usr/share/nginx/html/uploads | This variable represents the path on your machine where Manifest will persistently store your application files even after restarting your compose. Based on this variable Manifest will store your application files persistently. | /c/manifest/uploads:/usr/share/nginx/html/uploads |
| SELF-ASSIGNED CERTIFICATES | <put_here_path_to_folder_where_certs_will_store>:/usr/share/nginx/certs | If clients want to use their own certs they can replace certs in this folder and restart the web container and new certs will automatically be applied. IMPT! Certs must be named “nginx-cert.crt” and “nginx-cert.key” in order to work. Without these file names, Manifest will create self assigned certs and will use those instead. | c/manifest/uploads:/usr/share/nginx/certs |
| IP_ACCESS | <PUT_VM_IP_ADDRESS> | Based on this variable manifest will create self-signed ssl certificate. | 10.0.0.83 (This information can be obtained by typing ipconfig into your machines terminal) |
| Variable | Variable Type | Variable Description | Example |
|---|---|---|---|
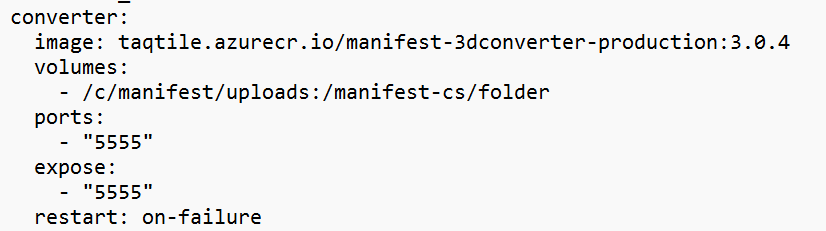
| VOLUMES | </put/path/to/file/storage/here>:/manifest-cs/folder | Based on this variable, Manifest will store your 3D models persistently | /c/manifest/uploads:/manifest-cs/folder |
Deploying a New Docker Instance
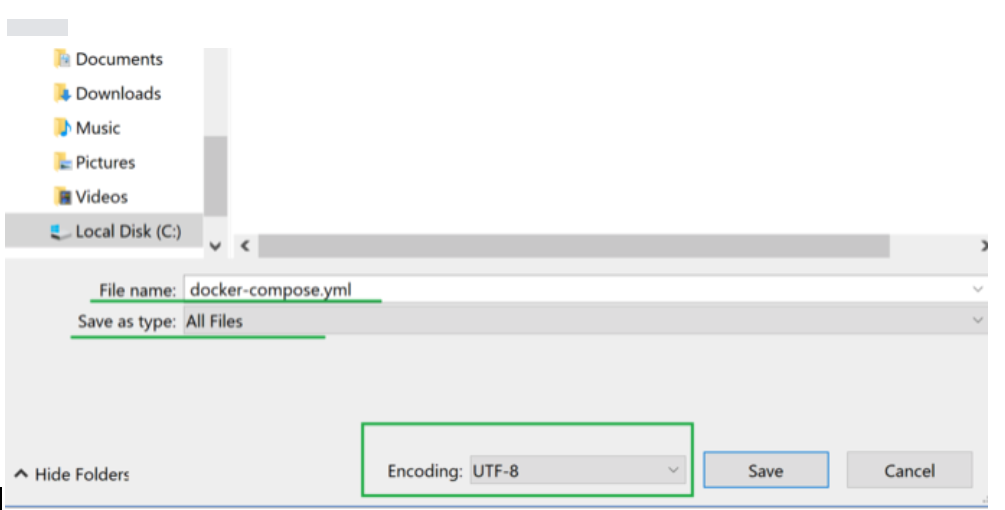
Once the docker-compose.yml file is populated with all variables and checked for accuracy, please follow the below instructions to deploy a NEW docker instance.- Save the file with name docker-compose.yml and type “All Files.” Change Encoding to UTF-8
- Once the docker-compose.yml is saved you should see a file with YML format:

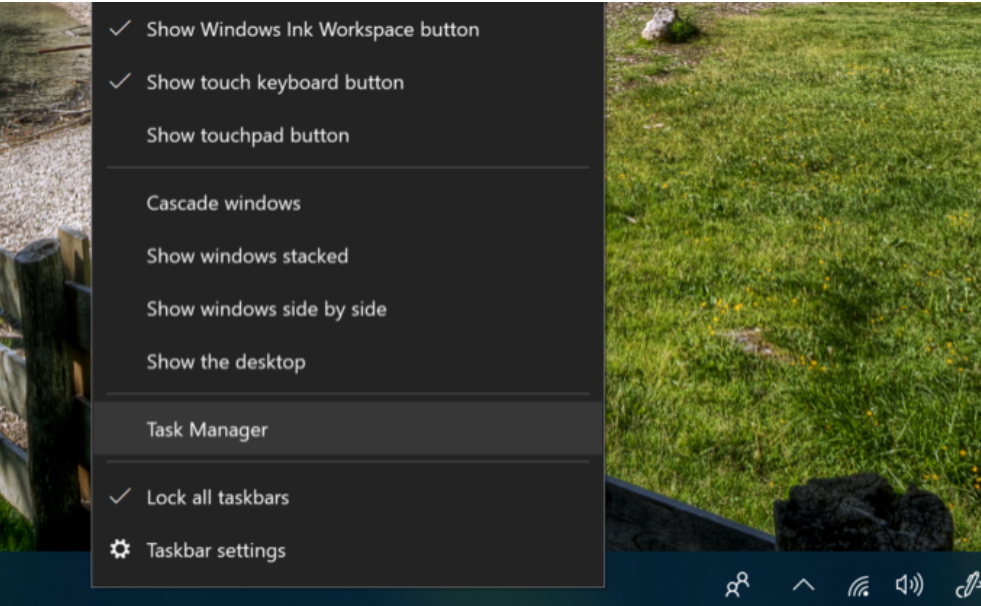
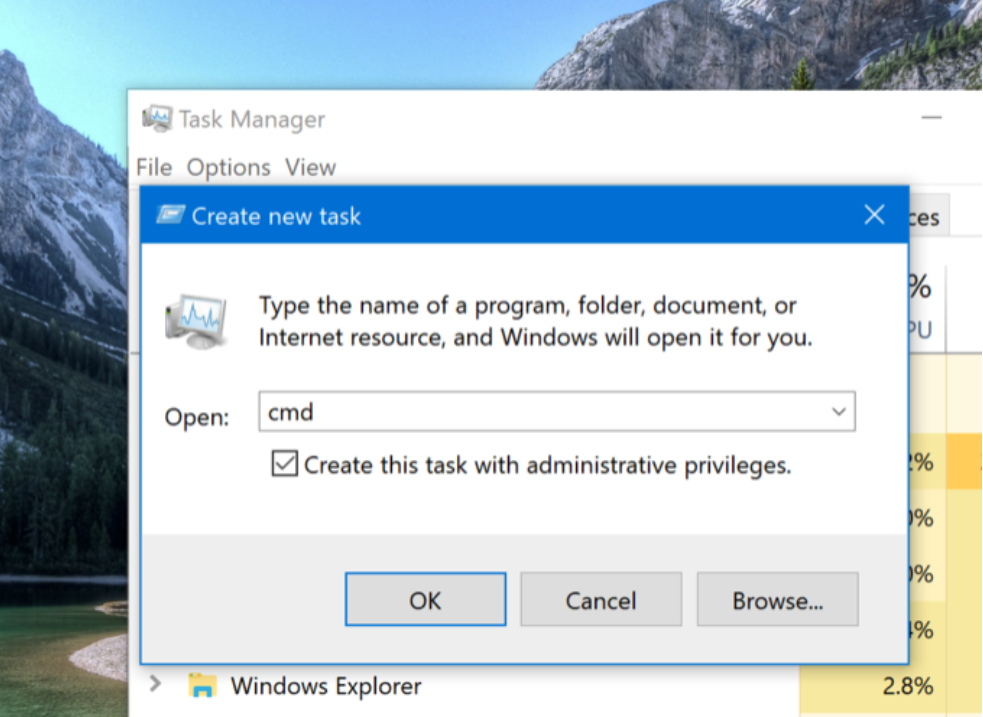
- Run cmd as Administrator
- Right click mouse button on the start menu and choose “Task Manager”
- Click on File—> Run new task, write “CMD” and check the box to run as Administrator and press [OK]:
- Copy the below command in CMD
docker login taqtile.azurecr.io -u 131d655d-5dc7-436f-b569-d793c840a088and then you will be prompted for the password. Please obtain the password from your Account Manager.
-
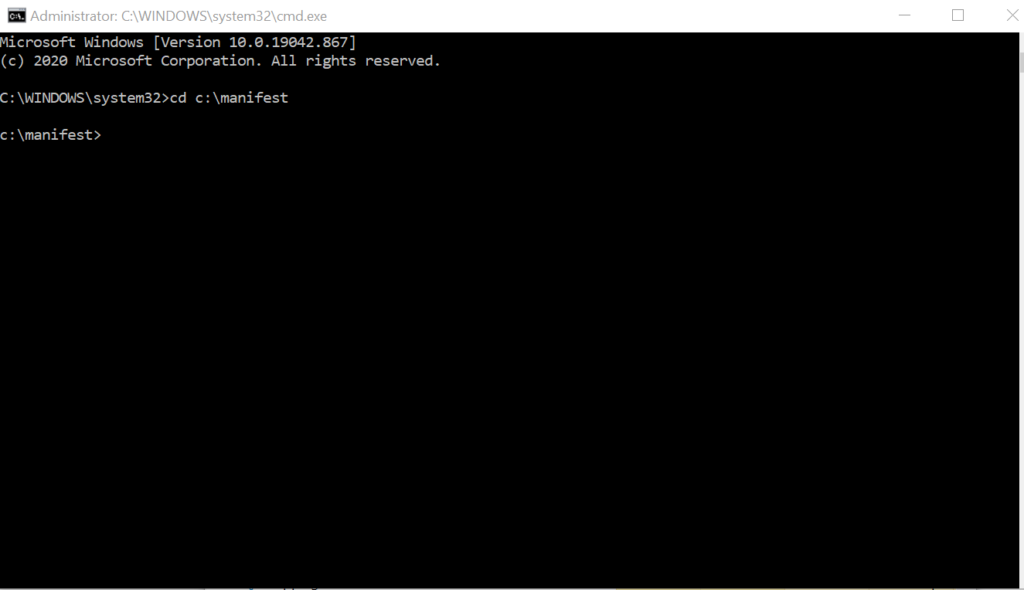
Change current directory to c:/manifest by typing the below command:
cd c:/manifest
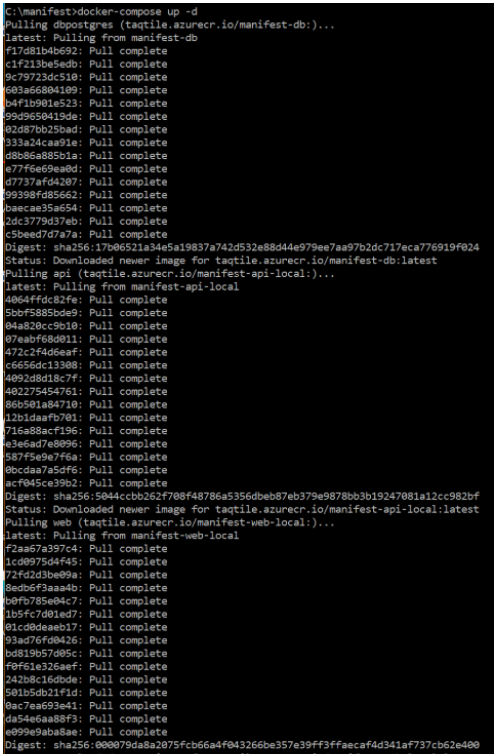
- Copy the following command in CMD and the process will start. It may take some time, so please be patient. As a result you will see “…done”
docker-compose up -d
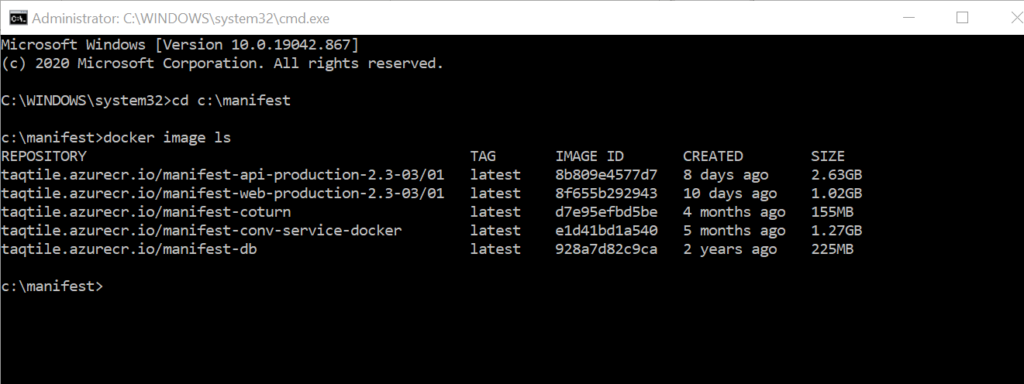
- Check your docker results with the command outlined below in CMD. This will show the all the docker containers.
docker image ls
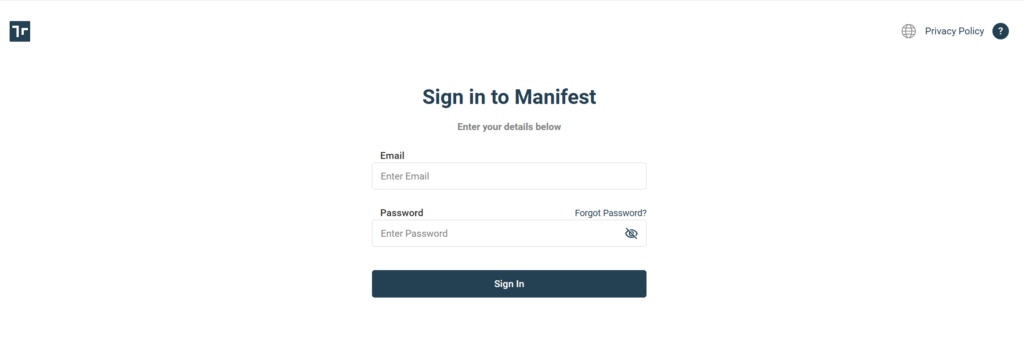
- Open your Chrome Browser and type localhost OR your local IP address in your browser. You will be directed to the Manifest login page. Enter in the following credentials to log into the Manifest Client Application.
- Email: <Email from docker-compose file> [API Variable: ADMIN_EMAIL]
- Password: <Password from docker-compose file> [API Variable: [ADMIN_PASSWORD]
- To access docker on the HL2 device, in the Command Prompt, type ipconfig to obtain your IPv4 address. This is also the variable entered into your compose file: IP_ACCESS as your Web and API Variable.

- Congratulations! You’ve created a new client and can start working with it.
Updating an Existing Manifest On-Prem Instance
The instructions below show how to update the docker container when an existing docker is already installed. Updating your docker instance will not clear the existing content already added to the docker. It will simply update it to the latest version.- Make sure your docker is installed and working
- Update your c:/manifest folder with the updated docker-compose.yml file. Make sure all the variables have been updated in the docker-compose.yml file
- Reference the Docker Release notes section of the Community site to obtain the new images and changes to the docker-compose.yml file
- Ensure that you update your docker-compose.yml file with all the changes outlined in the Release notes. In some cases it will not only be the images that are new but also some additional changes to the compose file.
- Run CMD as Administrator
- Click on File —> Run new task, write “CMD” and check the box to run as Administrator and press [OK]
- Open up a command prompt
- In the Command line, enter: docker login taqtile.azurecr.io -u 131d655d-5dc7-436f-b569-d793c840a088
- You will be prompted for a “Read Only” Password that you will need to obtain from your Account Manager
- Change the current directory to c:/manifest by typing in the below command:
cd c:/manifest - Run the following commands in the order outlined below:
docker-compose down docker-compose pull docker-compose up -d
-
Check your docker results with the command
docker image lsin CMD. This will show all the docker containers. -
Open your Chrome Browser and type localhost OR your local IP address in your browser. You will be directed to the Manifest login page. Enter in the following credentials to log into the Manifest Client Application.
- Email: <Email from docker-compose file> [API Variable: ADMIN_EMAIL]
- Password: <Password from docker-compose file> [API Variable: [ADMIN_PASSWORD]
-
To access docker on the HL2 device, in the Command Prompt, type
ipconfigto obtain your IPv4 address. This is also the variable entered into your compose file: [IP_ACCESS] as your Web and API Variable. On devices Login page enter in the IPv4 address into the domain field and enter in your Email [ADMIN_EMAIL] and Password [ADMIN_PASSWORD] credentials. It’s important to note that you may have to disable your firewall to get docker up and running on the HL2 device. - Congratulations! You’ve updated your docker to the latest version. When logging in you should still see all the content that was previously created from past versions.